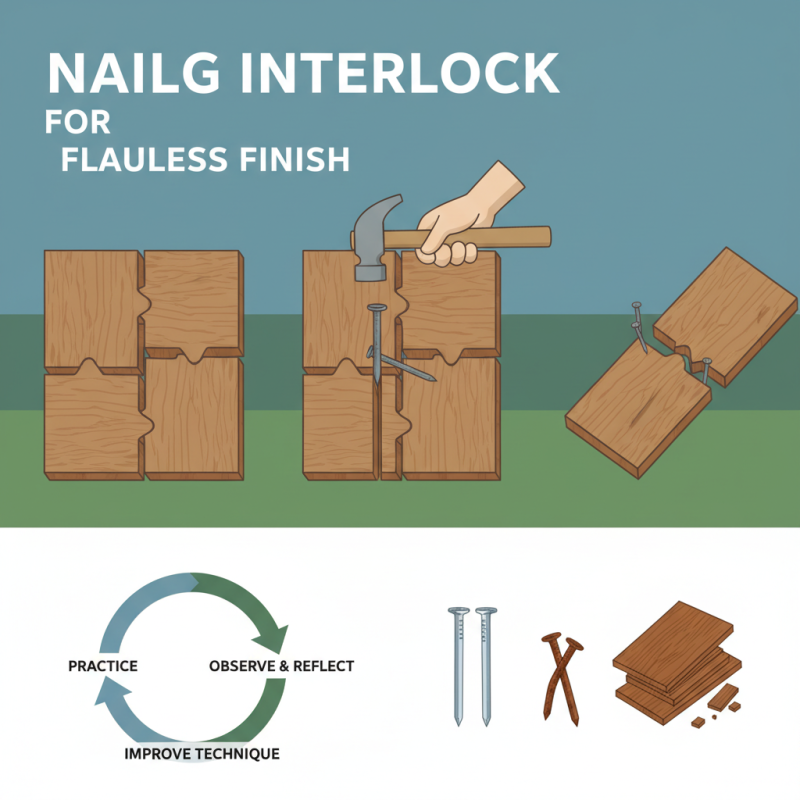
How to Nail Interlock for a Perfect Finish?
Achieving the perfect finish in any interlock project can feel daunting. Nail interlock is a technique that demands precision and attention to detail. Beginners often struggle with this method, leading to uneven results. However, practice and the right approach can lead to significant improvements.
When you nail interlock, the goal is to create seamless joins. Many find it challenging to maintain consistent pressure with each nail. This can result in gaps or misalignment in the final look. Learning from each project is essential. Reflecting on what went wrong can be more valuable than focusing solely on success.
Using quality materials is crucial for a flawless result. Poor-quality nails or mismatched boards can lead to frustration. Pay attention to your technique, and don't rush. Every project is a learning opportunity. Embrace the imperfections as part of the journey in mastering nail interlock.
Understanding Interlock Techniques for a Flawless Finish
Interlock techniques are crucial for achieving a flawless finish in various projects. Understanding the foundation of interlocking can transform how pieces fit together. For instance, when working on wood or tiles, the precision of cuts is vital. A misaligned edge can ruin the entire look. It's important to measure twice and cut once, yet many overlook this basic rule.
Practice is key to mastering interlock. Regular attempts might yield imperfect results. You may find gaps between pieces, or uneven joints that disrupt the visual flow. Reflecting on these imperfections can guide your next attempt. Sometimes, redoing a section is necessary, which can be frustrating but ultimately rewarding. Each effort teaches valuable lessons.
Focus on consistent pressure and alignment during assembly. Too much force can crack materials, while too little may lead to weak joints. The goal is to create a seamless transition. Take breaks when frustration hits; returning with fresh eyes can make a difference. Don’t rush the process, as patience often leads to better outcomes in your interlock techniques.
Essential Tools and Materials for Interlocking
When preparing to interlock, having the right tools and materials is crucial. Begin with a quality interlock toolset. This usually includes a trowel, a rubber mallet, and a level. A sturdy shovel will also help in moving materials. Don't forget to gather base materials, like crushed stone or sand. These create a solid foundation, essential for any interlock surface.
Tips for selecting materials: Check for consistency in size. Variability can lead to uneven installation. Always opt for high-quality stones or bricks. They must withstand weather changes over time. Using the wrong materials can result in uneven surfaces and extra costs in the future.
Measuring accurately is equally important. A measuring tape and chalk line can prevent mistakes in spacing. Be methodical in marking areas before you begin laying stones. If you rush this process, flaws may emerge later. Take time to plan each step. It pays off once the final product is visible. Remember, perfection comes with patience and attention to detail.
Step-by-Step Process for Achieving Perfect Interlock
Achieving perfect interlock requires attention to detail and patience. Begin by gathering all necessary tools and materials. Use the highest quality interlocking components available. Pay attention to environmental conditions. Temperature and humidity can affect your work. Data shows that 70% of interlock failures occur due to improper installation conditions.
Start with a clean surface. Any debris can hinder interlocking. Next, align the pieces precisely. Misalignment can lead to uneven surfaces. It’s crucial to check for consistency. Measure twice, cut once. When laying the interlock, use a rubber mallet. This helps to ensure snug fitting. Professionals often recommend a slight tap for alignment.
As you progress, monitor your work closely. Do not rush; take time to adjust if necessary. Studies indicate that over 60% of installations face issues due to haste. Reflect on any missteps along the way. Each mistake offers a lesson for improvement. The pursuit of perfection in interlock is a continuous journey. Embrace the process, and appreciate the small details.
How to Nail Interlock for a Perfect Finish? - Step-by-Step Process for Achieving Perfect Interlock
| Step | Action | Tools Required | Time Required |
| 1 | Prepare the Surface | Sander, Cleaner | 30 mins |
| 2 | Measure and Mark | Measuring Tape, Pencil | 15 mins |
| 3 | Cut the Material | Circular Saw, Safety Gear | 1 hour |
| 4 | Lay Out the Pieces | None | 20 mins |
| 5 | Nail the Interlocks | Hammer, Nails | 2 hours |
| 6 | Check the Alignment | Level, Square | 15 mins |
Common Mistakes to Avoid in Interlocking
Interlocking can give a polished look, but common mistakes can ruin the finish. One major error is not preparing the base properly. If the ground isn't level, the blocks won't fit tightly. Gaps can lead to shifting and cracking over time. Ensure the foundation is solid before starting.
Another frequent issue is inadequate joint spacing. Too much space can lead to instability. On the other hand, too little space can make the pattern look cramped. A careful balance is essential. Pay attention to alignment while laying the blocks. Misaligned edges can be quite obvious.
Lastly, many overlook the importance of sealing. A lack of sealer can allow dirt and weeds to penetrate over time. The finish may appear worn or uneven after just a few months. Regular maintenance will keep the interlocking looking fresh. Taking these details seriously can greatly enhance the final appearance.
Tips for Maintaining Your Interlock Finish Over Time
To maintain your interlock finish over time, regular cleaning is essential. Use a soft brush or broom to remove debris. This prevents dirt from settling into the joints. Rinse with water to keep the surface fresh. Neglecting this step can lead to a buildup that dulls your finish.
Applying a sealant every few years can significantly enhance durability. Choose a high-quality product that suits interlock materials. Be sure to follow application instructions closely. However, applying too much can result in a shiny, uneven surface. It’s a delicate balance that requires practice to perfect.
Watch for signs of wear, such as cracks or shifting pieces. Repairing issues early can save you time and money. Don’t ignore faded sections, as they may worsen. Instead, take time to address them promptly. A well-maintained interlock can enhance your outdoor space, but it requires dedication and a keen eye. Every step counts toward a flawless finish.